Support
Always with you in every technical adversity.
Contact Us
info@quikbooknxt.com
Live Chat
support@quikbooknxt.com
How to access cloud server from your local computer:
For Windows:
Step 1: Download & save the attached RDP connector sent along our server dispatch email on your desktop.
Step 2: Double-click the icon & enter the password when prompt.
Check Mark “Don’t ask me again for connections to this computer”
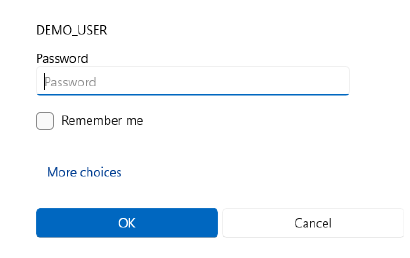
Find the password in the server dispatch email. Check Mark “Remember me” to save the password.
For Mac:
Download & install “Microsoft Remote Desktop” (Beta version) application from the App Store or the below link.
Link to download

You may need to approve some additional permissions once you’ve opened the Microsoft Remote Desktop app. Approve and accept these, and then you can begin using it.
Adding a Remote Desktop Connection
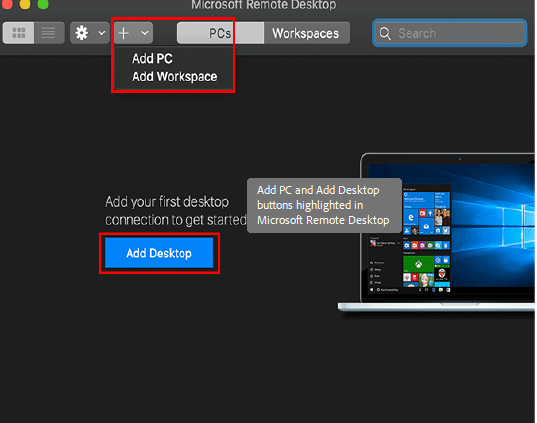
Once you’ve opened the Remote Desktop for Mac, you’ll be able to add a new remote desktop connection.
Click the Add Desktop button in the center of the window. Alternatively, click the plus button in the top menu, then click Add PC or Add Workspace.
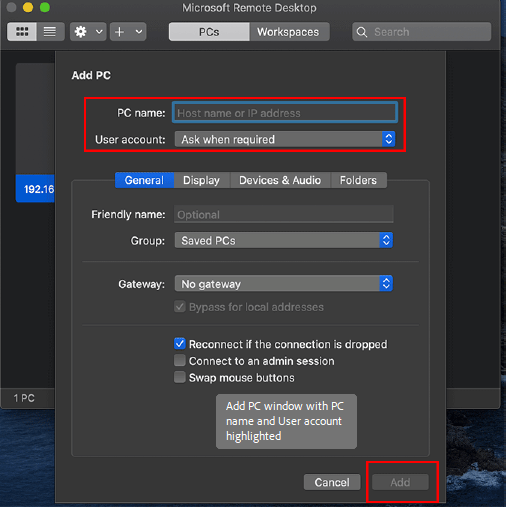
Fill out the Add PC form with the relevant information for your remote Windows PC. To use the standard RDP settings, start by adding your Windows PC’s IP address in the PC Name text box. Provide a memorable name in the Friendly Name box. Click Add once the settings are confirmed.
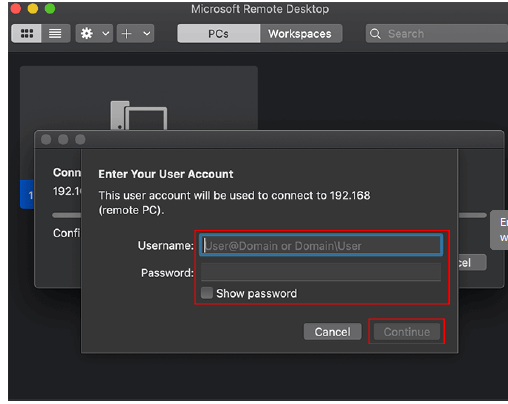
Your connection will appear, saved and ready to connect in the main Remote Desktop for Mac window. Double-click on the entry to begin your connection. You’ll be asked to provide the username and password for your Windows PC at this point. Provide them, then click Continue to connect.
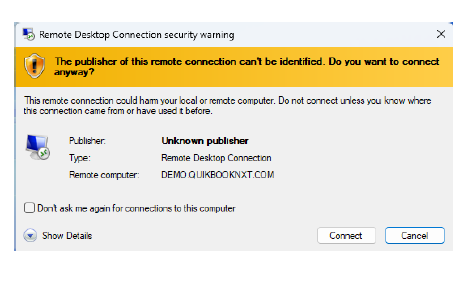
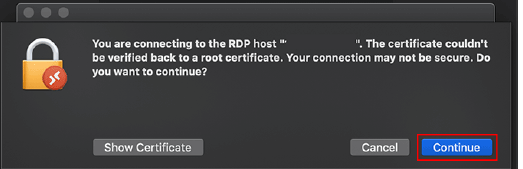
If it’s your first connection, you may need to accept a security warning. Make sure you only agree to this if you’re connecting to a server you trust. If you do, click Continue to disregard the message and make the connection.
After a few seconds, the remote desktop connection to your Windows PC will complete and launch, full screen, ready for you to use.
Configuring a Remote Desktop Connection
Further configuration options are available, including the ability to change the quality of the connection and to redirect local devices connected to your Mac to your remote Windows PC.
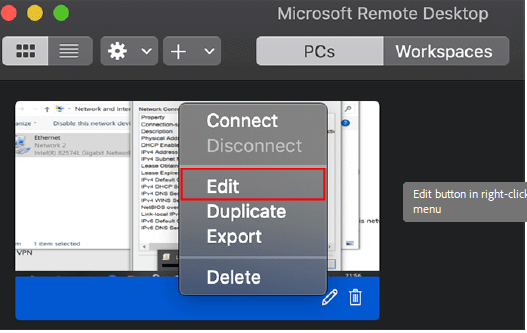
To edit a saved connection, hover over your server and click the pencil button. Alternatively, right-click on the saved connection and click Edit
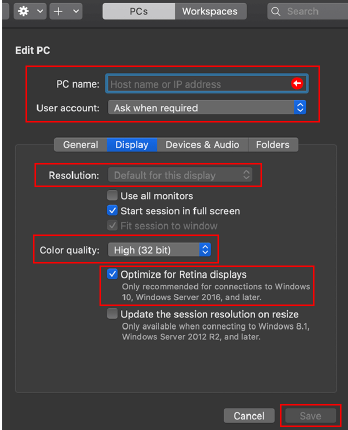
If you have a Mac with a Retina display, you’ll want to optimize the resolution of your remote connection. In the Display tab, click to enable the Optimize for Retina displays checkbox. You can also customize the color quality of your connection from the Color quality drop-down menu. You can set the overall resolution of your connection from your Resolution drop-down menu. Click Save to complete.
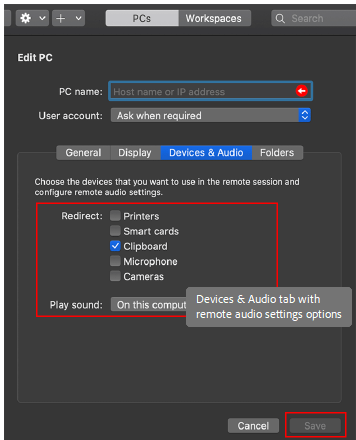
In the Devices & Audio tab, you can select what local devices you want to be able to access on your remote Windows PC. Click to check any of the checkboxes listed. You can also select whether to play sounds locally or remotely from the Play sound drop-down menu. As before, click Save to complete.

Sharing Files & Folders Between Mac & Windows
It’s also possible to share files and folders between your local Mac computer and your remote Windows PC.
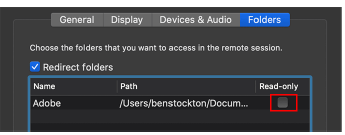
To do that, right-click your saved server and click Edit, then click the Folders tab. Click the Redirect Folders checkbox, then click the plus button at the bottom of the window.
Select the folders you want to share in the Finder window, then click Open to add them to your list. If you want to make them read-only, click the checkbox next to each folder entry under the Read-only column. Click Save once you’ve finished adding the folders you want to share.